Wednesday, February 03, 2010

Fixed positioning with WebApp.net

Introduction

It is actually not possible with mobile Safari to realize CSS fixed positioning. As a result of this constraint, iPhone web applications can not have fixed header or footer positioning natively.

Hopefully, there is a trick powered by several lines of javascript….Thanks a lot to cubiq.org !!!

This powerful javascript file allows you to include a scrollview to your webapp and choose to specify if you want an horizontal or vertical scrollbar…or both.

Of course, this trick is available for all webapp microframework and is working as well with WebApp.net !

Integration

This demonstration will show you how to include a fixed header to your WebApp.

  • Step1: Download the script from here.

This original script can be replaced by this one if you want to restrict scrolling to the correct direction. I have used the modified version for this demonstration.

  • Step2: Include the script in your webapp

You simply need to add the downloaded javascript in your html file.

image

  • Step3: Initialize the “scrolling framework”

In the WebApp.net load callback, you need to add the following code:

image

Add the following CSS style to your WebApp.net application as well

image

  • Step4: Add the wrapper in the WebApp.net application

Before the iGroup div block, include the wrapper and scroller divs as followed:

image

  • Step5: Enyoy !!!

You can take a look of the demonstration here.

Conclusion

This trick is really an interesting solution waiting for the native one provided by Apple...

Sunday, January 17, 2010

JSON Cross domain…How it works

Introduction

More and more applications are mashup applications and need to make several JSON requests to multiple external services. Actually, for security reasons, AJAX requests can only be done in the same domain used for the application itself…How can we solve this cross domain problem ?

The solution called JSONP exists from 2 or 3 years using the HTML script tag. Indeed this tag is mostly used to load several Javascript files from different servers.

Therefore, the solution/trick consists of creating dynamically a script tag with the source attribute pointing to the external JSON server and passing in the url the Javascript  callback function name.

The server part needs to be modified as well to treat this kind of cross domain requests. The server will read from the url, the callback function he needs to call with the resulting data.

Implementation

  • Creating the Javascript function in charge of creating the script tag

image

  • Calling the external JSON server

As you can see the Javasript callback function name is passed as an url argument.

image

  • Adapting the External JSON server

Of course, you need to have the possibility to modify the JSON server part to have the solution working !

The servlet or PHP code needs to read the callback name and return the appropriate answer

image

Conclusion

This JSONP solution is very useful for mashup web applications. Of course, this solution requires to have the target server implementing the JSONP protocol. Google and Yahoo JSON services have already implemented this protocol in their services.

A second problem with this solution is that only GET requests can be done through cross domain….No solution are available regarding POST requests…

This post is mostly inspired from this french blog.

Friday, January 15, 2010

iPhone, Flash and… Javascript

Today i read a post about someone who has implemented a Javascript engine in charge of reading flash files…

The article is available here.

I found first that it was a fake…but after downloading the source files it appears that is was a real project !!!

Actually the engine, in its current stage is very limited and not useful for anything… I have tested with different flash files and only very basic files are working…

I'm really interested to know the Apple strategy regarding flash... How can we imagine an iSlate or the next iPhone without flash !!!

Saturday, January 02, 2010

Scalable Image with GWT2.0 and DataResource

Introduction

Today, i wanted to use an ImageResource combined with an Image widget to display a resizable image. My first approach was not the good one !!! and it’s why i decided to write this note to provide the trick. Hopefully GWT2.0 has the solution !

Using ImageResource

When using ImageResource, GWT2.0 uses a CSS background url property to render the complete image and set automatically the width and height properties with the image original size. You can see the sources and related CSS just below.

image

image

image

Resizing the original image

My objective was to resize the original image. I tried to use the setSize method. When running the application, the image was cropped (0, 0, 400, 300) and not resized.

image

image

The problem with this ImageResource implementation is that a CSS background property is used and CSS does not allow to resize an image background yet.

The DataResource to the rescue !

The DataResource solution does not use the CSS background property but fills the img src property with the base64 encoded image. The image is correctly resized with the setSize() method.

image

image

image

Conclusion

When the objective is to display a simple image with the original size, using ImageResource is the good approach. When an image dimensioning is required, the DataResource is the solution !

del.icio.us Tags:

Tuesday, December 29, 2009

Rounded button, CSS3 and GWT2.0 ClientBundle

Introduction

CSS3 introduces new powerful capabilities for web designers. Instead of merging several sub-images to generate a rounded button, CSS3 allows to define this button with properties.

This tutorial will not only expose the CSS3 instructions to create the  button. The new GWT2.0 ClientBundle facility will be used to create a GWT RoundedButton.

The basic GWT Button will be used with a dedicated CSS3 style provided by a ClientBundle.

Let’s go !

ClientBundle introduction

GWT2.0 introduces this new  functionality bringing the power of combining and optimizing resources into one download for things like text files, CSS, and XML. This means fewer network roundtrips, which in turn can decrease application latency, especially on mobile applications.

More information regarding ClientBundle can be found here.

Step1: Creating the CSS clientBundle

The .iPush style is used to polish the button in the “normal state”. Basic attributes like color, font and positioning are described in this section. As CSS3 webkit implementation is used, you can notice that a \ is added in front of the webkit. without this \, GWT compile will fire an error during compilation.

The .iPush.IBClassic is used to add the rounded button properties. A “templated button image” is required to define the button properties. This image will automatically adapt is size regarding the text contained in the button or the button forced width.

image

@url annotation is used to define the “templated” image required to design the button(lines 182-183).

  • the @url annotation will produce the url CSS instruction
  • the imageUrl1 is the image referenced in the CSS instruction
  • the bigButtonWhite is a reference to a property defined in the ClientBundle java file in charge of locating the image (.png). This java file will be presented just after…

image

If we take a look at the generated CSS with the Chrome developer tools, we can see that the image has been base64 encoded during the GWT compilation !! no additional network access is used to download the image.

image

Step2: Creating the Java ClientBundle

The Resources interface is used to define all the resources (CSS files, images, JavaScript..) that are part of the bundle.

The previous CSS file is referenced by the @Source(“test.css”) annotation, the image location defined in the CSS file is defined in this interface as well.

image

An other interface (MyCssResource) returned by the previous Resources interface is used to access the styles defined in the CSS file.

image

Using the button in the application

GWT.create method retrieves the Resources interface (56).

The button is “styled” with the MyCssResources iPush and iBClassic methods. This 2 methods are related to the .iPush and .iPush.iBClassic defined in the CSS file.

image

Finally, the resource is injected to the component (60)

And the result is:

image

Conclusion

This tutorial was for me the occasion to test the ClientBundle provided by the new GWT2.0 framework. Using ClientBundle seems really a good way to reduce the network transfers and only use the “active” part of the CSS.

Special thanks to Thomas Broyer who provide me efficient support !

del.icio.us Tags: ,,

Monday, December 28, 2009

Activity indicator with WebKit CSS animation

Introduction

It is possible to create loading indicators with animated gif. A lot of sites are proposing this service like mentalized.net.

An other approach is to use a CSS animation provided by Safari WebKit. This solution will work for WebKit browsers (Chrome, Safari).

I will expose briefly how this animation is working.

Tutorial description

Objective of this tutorial is to create a loading indicator that is activated when the user click on a start button.

Starting the tutorial

Step1: The Activity indicator HTML code

2 divs are used for the indicator.

  • The fisrt div(activityIndicatorCont) is used to add extra parameters of the indicator like text or background color.
  • The second div is used to display the transparent load indicator image. This div will be used during the CSS animation (rotation).

image

Step2: The Activity indicator CSS animation code

The activityIndicatorCont is used to customize the loading indicator (background-color, rounded border…). As the animation is only visible when the user clicks on the start button, this div is hidden.

The activityIndicator defines the animation parameters and the image used for the indicator.

image

Step3: The CSS keyFrames animation description

The animation used to rotate the loading indicator image is described in this section. The activity-indicator name will be used to reference this keyframes animation (JavaScript part).

image

Step4: Starting the animation with JavaScript

When the user click the go Button, the Javascript function starts the animation. The components becomes visible (line 10) and the animation name is assigned (line 11).

image

You can try the animation here.

You can download the project (html + css + png) here.

Conclusion

CSS webKit animation provides powerful animation possibilities. Actually the CSS functions described in this tutorial are only available for webKit browser (-webkit).

More information regarding the functionalities are available on the Apple developer website available here.

del.icio.us Tags: ,,

Monday, October 05, 2009

WebApp.Net and AdSense integration

Introduction

In a previous post, i have explained how to integrate AdMob advertising with WebApp.

Today Google has announced the launch of AdSense for Mobile (high end devices only). Thanks to this new feature, you can now develop your mobile advertising with Google as well !!!.

image

This post will briefly describe how to integrate AdSense with WebApp.Net framework.

Mini tutorial

Step1: Registering an AdSense account

Of course this step is mandatory. All explanation are described here.

Step2: Creating your app advertising

This 4 steps wizard helps you to customize your advertising (device type, format, colors, channels). The last step provides you the javascript code to be included in the web page.

image

Step3: Adding  the javascript to the WebApp.net app

Simply add the javascript code just after the iHeader section of the app and just before the IGroup section as described in the next picture.

image

Step4: Enjoy !!!

That’s all for the integration…You can see as easy it is…

image

The sample code and the demo for the tutorial is available here: http://visticot.frederic.perso.neuf.fr/webapp/adsense/

Conclusion

It is very easy to integrate both of AdSense and AdMob advertising API. What will be your choice ?

Friday, August 21, 2009

Add location in a IPhone WebApp with Google maps

Today, i wanted to test how to display user location on a Google maps using an IPhone Safari browser. In a previous blog, i have already demonstrated how to use the embedded JavaScript location Api provided by Safari. The only thing that was missing with that previous Web App was to display the user location on the Google maps.

For this demo, i have used the new Google maps Api (V3) available here.

I have developed 2 versions of the demo, 1 “standalone” Web App and an other Web App using the WebApp-Net framework.

Standalone WebApp

This very basic Web application will display your location when you click on the “Get Location” button. If you click on the “Watch Location”, the map will be refreshed each time your location has changed. To stop the tracking, you need to press the “Clear watch” button.

The location method used to retrieve your location can be GPS, WIFI, or other methods provided by the network.

Graphical interface:

As described in the next code, a div(map_canvas) is used to display the map.
3 buttons are available to get the location. A JavaScript listener is attached to each buttons to trig the location operation.
Initialization of the Google Maps Api is done in the initialize JavaScript method. 2 Divs are used to display the current location and address.

image

Google Maps initialization:

The initialize function initializes the Geocoder (used to return the address) and initialize the map. A default location is provided during the initialization.

image

JavaScript Safari Location Api:

4 functions are provided by the JavaScript Api to retrieve the location. Details of this function is available here. The displayLocation method is provided as callback when location is successfully retrieved by the location Api.

image

Sample application:

Go to this URL with your IPhone to test the application. http://visticot.frederic.perso.neuf.fr/webapp/loc/index-basic.html

Using the application, you can see that you can scroll the map !!!

 photo (2)

Using the WebApp-Net framework

I wanted to test if the WebApp-Net framework was “compatible” with the Google maps and Location Api. No particular “tricks” needs to be solved during the development. You simply need to add the div used to display the map as described in the next picture:

image

Sample application:

Go to this URL with your IPhone to test the application. http://visticot.frederic.perso.neuf.fr/webapp/loc/index.html

Actually, scrolling the map like the previous application is not possible, some investigation need to be done with the WebApp-Net framework.

photo (1)

Wednesday, August 12, 2009

WebApp.Net and AdMob integration

Introduction

When designing Web applications for IPhone, it could be useful to add advertising to your mobile application. My first idea was to use Google Ad for mobile but the product is only available for early access and i have not the possibility to use it.

After some googling, i have found that AdMob solution was a good alternative.

AdMob is an advertising platform specialized for mobile applications (Web and embedded). For the “business and marketing” side, they provide a suite of web tools to monitor and analyze web audience. For the developers, they provide a very flexible JavaScript Api witch is very easy to integrate in your WebApp. They also provide a dedicated SDK API for IPhone applications.

WebApp.Net is for me one of the best IPhone Web micro framework. It provides many powerful and easy to use items to help you designing great and must seen web applications for Apple's latest mobile devices.

After the presentation, let’s go to the integration…

Mini tutorial

Step1: Registering an AdMob account

This step needs only to be executed 1 time (and takes 5 minutes). It provides you an account and an access to the AdMob portal.

Step2: Registering a new web application

Click on the Add IPhone Site link

image 

Click on the IPhone Site icon. You need yet to provide information regarding your web site and the look and feel of the advertising. After feeling the form, click on the Add button.

image

If the step has been successfully completed, you should see the newly registered application in the list.

image

Click on the Setup link to access the JavaScript code that needs to be added in your mobile web site.

image

Copy the script in the clipboard…

Step3: Adding the JavaScript snippet in the WebApp

…and then simply past it in the section just after the iHeader section (before the iGroup).

Pay attention that you only need to insert the code one time, all the other layers will display the advertising.

image

Step4 Testing the result…and activating the script

The default JavaScript provided by AdMob is for debug purpose and does not provide any “real advertising”. One you have made your tests, you need to activate the script by setting the test parameter to false;

image

AdMob provides other interesting JavaScript functions described into their developer website

The sample application is available at : http://visticot.frederic.perso.neuf.fr/webapp/admob/index.html

The result of the previous sample code is shown in the next picture.

image 

Do not hesitate to give your feedback regarding AdMob and WebApp.Net !!!

del.icio.us Tags: ,

Wednesday, July 08, 2009

My first Google Analytics WebApp

Introduction

I really think that Google Analytics is a great application to display statistics about Web applications. I use this powerful tool to display statistics about my blog.

I have an IPhone and i would like to use an analytics WebApp on my mobile. Of course some WebApps and Apps are available on the Apple Store but those applications are not free or does not provide all the reports i need.

I have decided to create my own Webapp to use Google Analytics on my IPhone. To do this, i am using the Google Analytics API available here.

Google Analytics API

Most of the information required to use the API is available on the Google Web site, i will only sum up my understanding of the API and present a complete sample code using the API.

  • This Google Analytics API is available for Java and JavaScript. As my objective is to develop a Web client for IPhone, i have decided to use the JavaScript version.
  • Authentication and authorization steps are done by the Google JavaScript client library. No need to create a login /password page or request any user account information, all is done by the library. Multiple solution are provided for this step (see the Account Authentication APIS for more information). For my Web application, i have selected the AuthSub solution.
  • Flexible report configuration is available with the API. Only a simple HTTP request needs to be created with all the metrics and dimensions required by the report (huge quantity of statistics are available, the list is available here). As a result, the API returns an array of entries…simple…

Hello Google Analytics !!!

The API documentation provides an interactive sample code section used to test the API. The only problem i see with this sample code is that not all the HTML page is available and we can not easily “copy past” the code to create our own application…. It is why i have decided to create this page…

To begin…

You must be aware that it is not possible to test the API without deploying the HTML page on a server on the Internet. This is for security reason and Google needs to authorize your application. So the first thing to do is to register a new domain. This first step is mandatory and is clearly explained here.

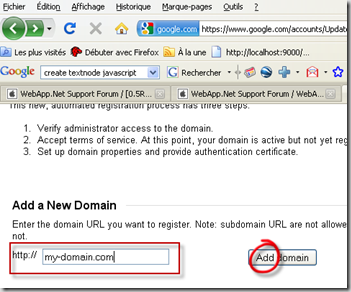
  • Domain creation

You need to enter your web server domain name or IP address.
image

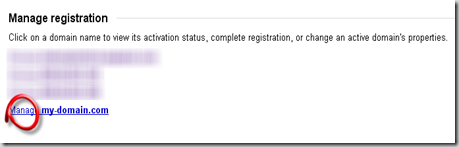
  • Managing you new domain

You only need to click on the domain name you have created on the previous step.
image

  • Domain verification and activation

Because the application i am using is available on a port different than 80, i have chosen the Upload an HTML file method. Google provides you an HTML file that you need to place on your WEB server. After uploading the file on your WEB server, please click on the Verify button.

image

The Web application

After successfully executed the previous step, you can now create the Google Analytics Web page. The following sample code is a very basic web application returning the available Google analytics profiles.

  • Adding a dummy image in your Web page…

your page must contain an image that's hosted at the same domain as your page. (see code line 63 of the next section).

  • Google Analytics initialization, authentication and authorization

The Google Analytics JavaScript API is loaded (line 3 and line 5). A callback to the init function is declared (line 6).

The initFunction(line 23) will check (with cookies) if the user is already authenticated. If the user is already authenticated, the statictics are displayed (line 32). If not (line 26) a Login button is displayed for authentication.

The login function (line 15) will ask the user if he allows the application to access his Google Account. If the user is not actually logged with his Google Account, the Google Login/Password page is displayed.

After this login operation, the Google Authentication will redirect the user to this page and the InitFunction will be called again. The initFunction will check if the user is authenticated (and it is the case now) and the statistics are displayed.

Remark: I actually don’t know how to redirect to another page… a next parameter is mention in some documents but i don’t know how to use it…

image

  • Asking for statistics

This step is very easy and correctly documented by the Google documentation. I have nothing to add… Only my sample code is provided here…

The available profiles are displayed in a table (line 64). To retrieve the different profiles, an HTTP requested is prepared (line 42) and the request is sent (line 43). A callback is provided in parameter (listProfiles method line 43). The callback method is in charge of formatting the result (line 48 to 58).

image

Download the HTML sample code

You can download the sample Web page here.

Conclusion

The Google Analytics API is a powerful library to manage the statistics of your Web sites. Authentication and authorization are managed as well with the Google Data API. Still a very good API from Google…

Monday, June 08, 2009

Google Gears Desktop Drag and drop operation

Introduction

During the Google I/O event, The Google Wave prototype has been unveiled. During the demonstration, a drag and drop operation has been realized between the desktop and the browser. This new capability is possible thanks the new Google Gears plugin V0.5.21.0.
The main new features available with this Gears version are:

  • Drag & Drop support for dragging files into a web page and letting the web page act on those files.
  • Image thumbnailing.
  • Blob builder API, which allows script to build binary blobs, including valid multi-part-form-encoded blobs that contain binary file parts, which can then be uploaded using Gears.HttpRequest.

In this post, i will demonstrate how to use 2 features:

  • Drag & Drop support between desktop and browser.
  • Image thumbnailing.

To illustrate those 2 interesting features, a basic web application is developed. This web application allows a user to drag and drop pictures from desktop to browser. The Gears plugin will resize the image to keep in the local server 2 versions of the image (1 thumbnail and 1 800x600 normalized). A basic image gallery browser allows to review the images even in offline mode.

Preparation

This demonstration is only available with Firefox3.0 with the Gears plugin V0.5.21.0.

Drag & Drop support

The drag and drop operation is available between the desktop and an HTML element of the web page. To specify the drop element target, listeners should be added to the DOM element. As you can see in the next JavaScript code, 4 events are configurable (‘dragenter’, ‘dragover’, ‘dragexit’, ‘dragdop’) and need to be linked to callbacks. Event names are clear enough to not be explained more.

This next JavaScript code illustrates how to activate or de-active the drag and drop operation on an HTML DOM element (dropZone).

image

The handleDragEnter, handleDragOver and HandleLeave callbacks call the finishDrag method in charge of modifying the mouse cursor (in blue, indicating that copy is in progress) and checking if the drop operation is allowed (in green)

image

The handleDrop callback is used to manage the drop operation. This function will do the following action:

  • Receive and analyze the file coming from the desktop. MetaData like the image dimension, imageType are available from the blob object (line 132)
  • Create a thumbnail of the picture(used later for the gallery). This operation is explained more into detail in the next paragraph.
  • Create a reduced picture (800x600) of the original picture.
  • Store those 2 new pictures in the Local server. The captureBlob (line 144) method is call to save the picture blob into the local server.
  • Store this new image in the local database.

image

Image thumbnailing

This new feature allow to resize a picture directly in the browser. This operation was not possible before and a round trip was required with the server to do this operation. Operation to resize a picture are the following:

  • Create a GearsCanvas (line 133).
  • Use the decode method with the blog information in parameter (line134).
  • Use resize method (line 135) to resize the image (2 methods are available: nearest and bilinear).
  • Use the encode method (line 136) to return the resulting blob.
  • To use the image later in the HTML page, the blob must be stored in the local server (line144).

You can note that it is not possible yet to display directly the resized image in the HTML web page and the Gears localServer must be used to store this picture. The img element tag will use this localServer image to display the picture in the browser.

A next step could be to create an other GearsCanvas and display the resizing picture blob directly in that canvas.

Accessing the demo and browsing the code

To test the prototype:

  • Use Firefox 3.0.
  • Install Gears V0.5.21.0.
  • Drag and drop pictures(more than 1024x768 images) in the drop zone.
  • The dropped image is displayed in the zone and added in the gallery. Multiple pictures can be drag and drop in the same operation.
  • The new added images are stored in the local server and in the localDb. When you will access the web page another time, the picture gallery is still present.
  • If you want to erase the Local store and the Local db 2 buttons are available.
  • In bonus, the web application is available offline (Gears feature). Some bugs are still present for the offline management mode.

The demo is available here.

The code is available here.

Conclusion

Those new Drag and Drop operation and thumbnailing features are very promising and can be use for multiple use cases where the traditional “browse button” was added in the web page. Those features are not HTML5 compliant and will be available only with the Gears plugin…

Frederic shared items