Monday, October 05, 2009

WebApp.Net and AdSense integration

Introduction

In a previous post, i have explained how to integrate AdMob advertising with WebApp.

Today Google has announced the launch of AdSense for Mobile (high end devices only). Thanks to this new feature, you can now develop your mobile advertising with Google as well !!!.

image

This post will briefly describe how to integrate AdSense with WebApp.Net framework.

Mini tutorial

Step1: Registering an AdSense account

Of course this step is mandatory. All explanation are described here.

Step2: Creating your app advertising

This 4 steps wizard helps you to customize your advertising (device type, format, colors, channels). The last step provides you the javascript code to be included in the web page.

image

Step3: Adding  the javascript to the WebApp.net app

Simply add the javascript code just after the iHeader section of the app and just before the IGroup section as described in the next picture.

image

Step4: Enjoy !!!

That’s all for the integration…You can see as easy it is…

image

The sample code and the demo for the tutorial is available here: http://visticot.frederic.perso.neuf.fr/webapp/adsense/

Conclusion

It is very easy to integrate both of AdSense and AdMob advertising API. What will be your choice ?

Friday, August 21, 2009

Add location in a IPhone WebApp with Google maps

Today, i wanted to test how to display user location on a Google maps using an IPhone Safari browser. In a previous blog, i have already demonstrated how to use the embedded JavaScript location Api provided by Safari. The only thing that was missing with that previous Web App was to display the user location on the Google maps.

For this demo, i have used the new Google maps Api (V3) available here.

I have developed 2 versions of the demo, 1 “standalone” Web App and an other Web App using the WebApp-Net framework.

Standalone WebApp

This very basic Web application will display your location when you click on the “Get Location” button. If you click on the “Watch Location”, the map will be refreshed each time your location has changed. To stop the tracking, you need to press the “Clear watch” button.

The location method used to retrieve your location can be GPS, WIFI, or other methods provided by the network.

Graphical interface:

As described in the next code, a div(map_canvas) is used to display the map.
3 buttons are available to get the location. A JavaScript listener is attached to each buttons to trig the location operation.
Initialization of the Google Maps Api is done in the initialize JavaScript method. 2 Divs are used to display the current location and address.

image

Google Maps initialization:

The initialize function initializes the Geocoder (used to return the address) and initialize the map. A default location is provided during the initialization.

image

JavaScript Safari Location Api:

4 functions are provided by the JavaScript Api to retrieve the location. Details of this function is available here. The displayLocation method is provided as callback when location is successfully retrieved by the location Api.

image

Sample application:

Go to this URL with your IPhone to test the application. http://visticot.frederic.perso.neuf.fr/webapp/loc/index-basic.html

Using the application, you can see that you can scroll the map !!!

 photo (2)

Using the WebApp-Net framework

I wanted to test if the WebApp-Net framework was “compatible” with the Google maps and Location Api. No particular “tricks” needs to be solved during the development. You simply need to add the div used to display the map as described in the next picture:

image

Sample application:

Go to this URL with your IPhone to test the application. http://visticot.frederic.perso.neuf.fr/webapp/loc/index.html

Actually, scrolling the map like the previous application is not possible, some investigation need to be done with the WebApp-Net framework.

photo (1)

Wednesday, August 12, 2009

WebApp.Net and AdMob integration

Introduction

When designing Web applications for IPhone, it could be useful to add advertising to your mobile application. My first idea was to use Google Ad for mobile but the product is only available for early access and i have not the possibility to use it.

After some googling, i have found that AdMob solution was a good alternative.

AdMob is an advertising platform specialized for mobile applications (Web and embedded). For the “business and marketing” side, they provide a suite of web tools to monitor and analyze web audience. For the developers, they provide a very flexible JavaScript Api witch is very easy to integrate in your WebApp. They also provide a dedicated SDK API for IPhone applications.

WebApp.Net is for me one of the best IPhone Web micro framework. It provides many powerful and easy to use items to help you designing great and must seen web applications for Apple's latest mobile devices.

After the presentation, let’s go to the integration…

Mini tutorial

Step1: Registering an AdMob account

This step needs only to be executed 1 time (and takes 5 minutes). It provides you an account and an access to the AdMob portal.

Step2: Registering a new web application

Click on the Add IPhone Site link

image 

Click on the IPhone Site icon. You need yet to provide information regarding your web site and the look and feel of the advertising. After feeling the form, click on the Add button.

image

If the step has been successfully completed, you should see the newly registered application in the list.

image

Click on the Setup link to access the JavaScript code that needs to be added in your mobile web site.

image

Copy the script in the clipboard…

Step3: Adding the JavaScript snippet in the WebApp

…and then simply past it in the section just after the iHeader section (before the iGroup).

Pay attention that you only need to insert the code one time, all the other layers will display the advertising.

image

Step4 Testing the result…and activating the script

The default JavaScript provided by AdMob is for debug purpose and does not provide any “real advertising”. One you have made your tests, you need to activate the script by setting the test parameter to false;

image

AdMob provides other interesting JavaScript functions described into their developer website

The sample application is available at : http://visticot.frederic.perso.neuf.fr/webapp/admob/index.html

The result of the previous sample code is shown in the next picture.

image 

Do not hesitate to give your feedback regarding AdMob and WebApp.Net !!!

del.icio.us Tags: ,

Wednesday, July 08, 2009

My first Google Analytics WebApp

Introduction

I really think that Google Analytics is a great application to display statistics about Web applications. I use this powerful tool to display statistics about my blog.

I have an IPhone and i would like to use an analytics WebApp on my mobile. Of course some WebApps and Apps are available on the Apple Store but those applications are not free or does not provide all the reports i need.

I have decided to create my own Webapp to use Google Analytics on my IPhone. To do this, i am using the Google Analytics API available here.

Google Analytics API

Most of the information required to use the API is available on the Google Web site, i will only sum up my understanding of the API and present a complete sample code using the API.

  • This Google Analytics API is available for Java and JavaScript. As my objective is to develop a Web client for IPhone, i have decided to use the JavaScript version.
  • Authentication and authorization steps are done by the Google JavaScript client library. No need to create a login /password page or request any user account information, all is done by the library. Multiple solution are provided for this step (see the Account Authentication APIS for more information). For my Web application, i have selected the AuthSub solution.
  • Flexible report configuration is available with the API. Only a simple HTTP request needs to be created with all the metrics and dimensions required by the report (huge quantity of statistics are available, the list is available here). As a result, the API returns an array of entries…simple…

Hello Google Analytics !!!

The API documentation provides an interactive sample code section used to test the API. The only problem i see with this sample code is that not all the HTML page is available and we can not easily “copy past” the code to create our own application…. It is why i have decided to create this page…

To begin…

You must be aware that it is not possible to test the API without deploying the HTML page on a server on the Internet. This is for security reason and Google needs to authorize your application. So the first thing to do is to register a new domain. This first step is mandatory and is clearly explained here.

  • Domain creation

You need to enter your web server domain name or IP address.

image

  • Managing you new domain

You only need to click on the domain name you have created on the previous step.

image

  • Domain verification and activation

Because the application i am using is available on a port different than 80, i have chosen the Upload an HTML file method. Google provides you an HTML file that you need to place on your WEB server. After uploading the file on your WEB server, please click on the Verify button.

image

The Web application

After successfully executed the previous step, you can now create the Google Analytics Web page. The following sample code is a very basic web application returning the available Google analytics profiles.

  • Adding a dummy image in your Web page…

your page must contain an image that's hosted at the same domain as your page. (see code line 63 of the next section).

  • Google Analytics initialization, authentication and authorization

The Google Analytics JavaScript API is loaded (line 3 and line 5). A callback to the init function is declared (line 6).

The initFunction(line 23) will check (with cookies) if the user is already authenticated. If the user is already authenticated, the statictics are displayed (line 32). If not (line 26) a Login button is displayed for authentication.

The login function (line 15) will ask the user if he allows the application to access his Google Account. If the user is not actually logged with his Google Account, the Google Login/Password page is displayed.

After this login operation, the Google Authentication will redirect the user to this page and the InitFunction will be called again. The initFunction will check if the user is authenticated (and it is the case now) and the statistics are displayed.

Remark: I actually don’t know how to redirect to another page… a next parameter is mention in some documents but i don’t know how to use it…

image

  • Asking for statistics

This step is very easy and correctly documented by the Google documentation. I have nothing to add… Only my sample code is provided here…

The available profiles are displayed in a table (line 64). To retrieve the different profiles, an HTTP requested is prepared (line 42) and the request is sent (line 43). A callback is provided in parameter (listProfiles method line 43). The callback method is in charge of formatting the result (line 48 to 58).

image

Download the HTML sample code

You can download the sample Web page here.

Conclusion

The Google Analytics API is a powerful library to manage the statistics of your Web sites. Authentication and authorization are managed as well with the Google Data API. Still a very good API from Google…

Monday, June 08, 2009

Google Gears Desktop Drag and drop operation

Introduction

During the Google I/O event, The Google Wave prototype has been unveiled. During the demonstration, a drag and drop operation has been realized between the desktop and the browser. This new capability is possible thanks the new Google Gears plugin V0.5.21.0.
The main new features available with this Gears version are:

  • Drag & Drop support for dragging files into a web page and letting the web page act on those files.
  • Image thumbnailing.
  • Blob builder API, which allows script to build binary blobs, including valid multi-part-form-encoded blobs that contain binary file parts, which can then be uploaded using Gears.HttpRequest.

In this post, i will demonstrate how to use 2 features:

  • Drag & Drop support between desktop and browser.
  • Image thumbnailing.

To illustrate those 2 interesting features, a basic web application is developed. This web application allows a user to drag and drop pictures from desktop to browser. The Gears plugin will resize the image to keep in the local server 2 versions of the image (1 thumbnail and 1 800x600 normalized). A basic image gallery browser allows to review the images even in offline mode.

Preparation

This demonstration is only available with Firefox3.0 with the Gears plugin V0.5.21.0.

Drag & Drop support

The drag and drop operation is available between the desktop and an HTML element of the web page. To specify the drop element target, listeners should be added to the DOM element. As you can see in the next JavaScript code, 4 events are configurable (‘dragenter’, ‘dragover’, ‘dragexit’, ‘dragdop’) and need to be linked to callbacks. Event names are clear enough to not be explained more.

This next JavaScript code illustrates how to activate or de-active the drag and drop operation on an HTML DOM element (dropZone).

image

The handleDragEnter, handleDragOver and HandleLeave callbacks call the finishDrag method in charge of modifying the mouse cursor (in blue, indicating that copy is in progress) and checking if the drop operation is allowed (in green)

image

The handleDrop callback is used to manage the drop operation. This function will do the following action:

  • Receive and analyze the file coming from the desktop. MetaData like the image dimension, imageType are available from the blob object (line 132)
  • Create a thumbnail of the picture(used later for the gallery). This operation is explained more into detail in the next paragraph.
  • Create a reduced picture (800x600) of the original picture.
  • Store those 2 new pictures in the Local server. The captureBlob (line 144) method is call to save the picture blob into the local server.
  • Store this new image in the local database.

image

Image thumbnailing

This new feature allow to resize a picture directly in the browser. This operation was not possible before and a round trip was required with the server to do this operation. Operation to resize a picture are the following:

  • Create a GearsCanvas (line 133).
  • Use the decode method with the blog information in parameter (line134).
  • Use resize method (line 135) to resize the image (2 methods are available: nearest and bilinear).
  • Use the encode method (line 136) to return the resulting blob.
  • To use the image later in the HTML page, the blob must be stored in the local server (line144).

You can note that it is not possible yet to display directly the resized image in the HTML web page and the Gears localServer must be used to store this picture. The img element tag will use this localServer image to display the picture in the browser.

A next step could be to create an other GearsCanvas and display the resizing picture blob directly in that canvas.

Accessing the demo and browsing the code

To test the prototype:

  • Use Firefox 3.0.
  • Install Gears V0.5.21.0.
  • Drag and drop pictures(more than 1024x768 images) in the drop zone.
  • The dropped image is displayed in the zone and added in the gallery. Multiple pictures can be drag and drop in the same operation.
  • The new added images are stored in the local server and in the localDb. When you will access the web page another time, the picture gallery is still present.
  • If you want to erase the Local store and the Local db 2 buttons are available.
  • In bonus, the web application is available offline (Gears feature). Some bugs are still present for the offline management mode.

The demo is available here.

The code is available here.

Conclusion

Those new Drag and Drop operation and thumbnailing features are very promising and can be use for multiple use cases where the traditional “browse button” was added in the web page. Those features are not HTML5 compliant and will be available only with the Gears plugin…

Wednesday, June 03, 2009

Location with Firefox3.5

The recent Google I/O event demonstrates the Firefox3.5 location feature. Indeed, in a near future, every HTML5 browser will have the possibility to return the browser location. This new interesting feature will allow developers to propose new kind of web applications taken into account user location.

Today, I decide to evaluate the Firefox3.5Beta4 location capabilities.
In a previous article, i had already evaluated the Safari IPhone3 W3C implementation. Idea was to verify if the same JavaScript code was working on both IPhone Safari and Firefox browsers.

For my tests, i take the same JavaScript used for the previous article and test it in the Firefox browser.

I’m happy to check that it works without ANY source code modification !!!

Even if it’s working fine, i have some interrogations regarding the location information returned by both implementation. I don’t understand very well how this location is returned with the IP address information. During my evaluation, without moving my laptop or changing my IP address, the location returned by the API is not always the same… more interesting, the location returned by both Safari and Firefox is not exactly the same !!! I will try in a next article to enter more into details in this interesting behavior.

Monday, May 18, 2009

Google App Engine for Java, GWT and GXT

Introduction

With the launch of the new Google App Engine (Beta) delivered with an Eclipse plugin managing GAE and GWT1.6, it is now very easy to deploy new GWT applications in the Google cloud.
GXT is a java library for building rich Internet applications with GWT. As demonstrated on their Web site, this library provides a huge quantity of graphical components to help you creating applications very quickly.

My objective was to evaluate how easy it is to deploy a basic application combining GAE-1.2.1, GWT-1.6.4 and GXT-2.0-md01.

Steps to create the application

Downloading and installing the GAE SDK-1.2.1

This step is done without any problem.

Installing the Eclipse Plugin for GAE

The Eclipse Plugin for GAE is easy to install as well and adds 3 buttons in the toolbar.
image

The contextual menu is modified as well to add a a Google entry

image

Those 3 buttons are used to:

  • Create a new GAE application. You can choose to use GWT, GAE or both. image
  • Compile the code (transform the Java code in JavaScript)
  • Deploy your application on the Google App Engine servers.

Adding the GXT2.0-md01 jar library

You simply need to add an external java library in the project.

image

Coding the application using GWT and GXT

No remark in this section, no specific think related to GAE.

Compiling and deploying the application

Of course, you need to have a developer account to deploy your application.
Before deploying the application, you need to enter the applicationId obtain on the GAE web portal

image image

After entering this information, you only need to click on the image button from the toolbar. A popup appears asking you to fill your Google password. If all is OK, you should visualize your application on a Web browser.

Remarks and problems

For a basic application, there is really no problem, compilation and deployment is working fine. For a more elaborated application with GXT library, problems can occurs.

StackOverflow error during compilation

You need to click on the Advanced link and add the –Xss16M VM argument.

image

Max number of files and blobs is 1000

Your application can use a lot of static files for images, CSS, and JavaScript. When the number of files is greater than 1000, the deployer fires an error.

image To avoid this problem, you need to reduce the number of static files included in your application.

Multiple options are available:
  • Locating your static file in an other Web server
  • Zipping the static files and serving those zipped files with a Servlet included in your application. This solution is working fine for development process but can not be used in a production solution. A link with a sample code is available ">here.

Other remarks

  • During the tests i need to connect behind a proxy. The Eclipse proxy configuration needs to be used to deploy the GEA with a proxy.
  • GAE can be used with an ant file available here. This build file does not include the target to compile the GWT code. To compile the GWT code with this build, you need to add the gwtc target section.

image

Conclusion

This post explains very quickly the main steps to create an application with GWT, GAE and GXT. The Eclipse Plugin is well designed and the application development is easy. I will try to continue playing with all capabilities provided by the GAE (database, …)

Sunday, May 17, 2009

Location with the IPhone Safari browser (SDK3.0)

Introduction

In a previous article, the Google Gears geo-location technology has been introduced to demonstrate how to retrieve the location from the Internet browser.

The IPhone SDK3.0 is introducing a W3C standardized location API in the Safari browser. Objective of this post is to evaluate this JavaScript API provided by the Mobile Safari browser.

I have found the following information from the Apple Web site:

  • A PDF document providing information regarding geographic location classes.
  • A podcast describing the JavaScript location API.
    image

IPhone Web application illustration

A very basic IPhone WebApp is developed to test the JavaScript API.
The WebApp.Net micro framework has been used for this evaluation.

The application is containing the JavaScript code used to retrieve the location. This code is located in the <script> section of the HTML page. As you can see, 3 JavaScript functions has been used and any JavaScript import or other configuration is required.
You can call directly the navigator.geolocation.watchPosition function without any initialization…the navigator object is already known by the Safari…

  • getCurrentPosition returns the current position in the displayLocation callback.
  • watchLocation is used to track the IPhone location. Each time a new location is available, the displayLocation callback is triggered. This method is returning a watchId used to stop the tracking.
  • clearWatch is used to stop the tracking started with the watchLocation.

image

The getCurrentPosition and watchLocation can have up to 3 parameters in input:

  • The success location callback is returning a Position object.
    image
    I have only checked that longitude, latitude and accuracy was returned, i need to complete the tests for altitude and speed. For the heading (direction) i think that this information is not returned with the current IPhone.
  • The error callback is returned in case of error image
  • The PositionOptions object has 3 parameters image

Starting the WebApp

When starting the application for the first time, the Safari browser displays a popup. You need to confirm that you agree to give your location. After multiple uses, the popup does not appear anymore.

In this sample application, the location is displayed in a popup.

image image

Conclusion

The W3C standard API provided with IPhone 3.0 SDK is very easy to use and provides a position through multiple sources (GPS, WIFI, BTS…).
Any Geocoding API is provided by Safari to retrieve an address from this location.
This interesting feature is available with the Google Gears API…
During my evaluation (with the Beta version), the Safari browser was frozen multiple times and i need to restart the mobile…

The application sample will be available in a near future…

GeoLocation with Google Gears and GWT

Introduction

Geo-location is used and available everywhere and it exists multiple solutions to retrieve the position.
Computed position is more or less accurate regarding the technology used.

  • Basic handsets can retrieve the location thanks the operator base stations.
  • GPS handsets can retrieve a more accurate position with GPS or AGPS technologies.
  • When GPS signal is to limited and WIFI available, WIFI positioning can be used...

More and more applications are available with location capabilities.
Those applications are used to find the nearest restaurant, cinema.
Big companies are launching new services to locate your friends (Google Latitude)…

To create those applications, a location API is required to get the handset or laptop position.
The main features of those API are:
  • Returning a position (longitude, latitude, speed) taking abstraction of the underlying technologies (GPS, WIFI, BTS...)
  • Returning the response accuracy.
  • Tracking the handset(return multiple location each time a modification is observed)

This article will focus on the location API's available for PCs and laptops Internet browsers(Safari, IE, Firefox) and more especially on the Google Gears technology.

Google Gears

Google is proposing the Gears API for Geo-Location purpose.

This Google API like the majority of other APIs is returning the position BUT can in addition return geocoding information like the country, city, street number, street and region information.
After installing this plugin, web applications have the possibility to retrieve the location from the Internet browser.
A very basic JavaScript API is proposed to fulfill the main location features exposed previously.

For people familiar with the Google Web Toolkit framework, this Gears API is available as a GWT module.

Next part of the article will demonstrate how to use this GWT Gears API.

To create a web application with GWT and Gears, you need:

  • Download the Gears plugin available Here
  • Download the Gears GWT module available Here
  • Create a basic GWT application with Eclipse or other Java editor

The GWT-Gears Java code

Retrieving the GeoLocation service from the Gears factory

image

To retrieve the current location, you can use the getCurrentPosition method. As you can see in the code, options can be used to specify the accuracy.

If you want to retrieve the address information determined from the longitude and latitude, you need to set the gearsRequestAddress to true. By default, the geocoding is disabled.

image

If you want to be notified each time the location is modified, you need to use the watchPosition method. This method is returning an identifier used to stop the tracking.

image

If you want to stop the tracking (started with the watchPosition method), you need to call the clearWatch method.

image

Conclusion

The Google Gears API (available as a JavaScript library or a GWT module) is very easy to use and provides interesting geocoding features to retrieve Address information.

A W3C standard available here is describing an API for location for Web browsers. The Google API seems very closed from this specification.

In a next article, an overview of the IPhone3.0 Safari location API will be exposed.

Saturday, October 25, 2008

IUI library for Iphone

I'm evaluating the IUI library for the iphone. This library has a dedicated .css and .js to skin an iphone web appliation. This library is using AJAX technology for better performances. Take a look to this video for a better understanding

Thursday, October 23, 2008

JSF and Weblets, how simple it is …

When creating JSF components libraries, the rendering part of the JSF component needs make some references to resource files (.css, .js, images).

Those resources needs to be stored in the component library jar file. By this way the webapp using this library does not require any configuration.

Main JSF frameworks (Trinidad, Adf, IceFaces…) already include a resource manager servlet used to retrieve resources files.

When creating a JSF component library from scratch (starting from MyFaces or Sun JSF implementation), this kind of resource manager does not exist and it is in charge to the library developer to manage the resource management.

Different solutions are available and are described in the post:

http://www.developpez.net/forums/d239467/java/developpement-web-java/frameworks/jsf/participez-creation-faq-jsf/

This post will sum-up the weblets1.0 solution.

Objectives of the weblets project is to simplify the management of resources. Weblets are not restricted to JSF frameworks and can be use in multiple ways.

Steps to call a resource from JSF component:

1. Downloading the weblets libraries(weblets-api-1.0.jar, weblets-impl-1.0.jar) and add it in your project

2. Creating the weblets-config.xml file located in the META-INF directory of the component library.

<?xml version="1.0" encoding="UTF-8" ?>


myapp.resources
net.java.dev.weblets.packaged.PackagedWeblet

package
com.myapp.resources


myapp.resources
/resources/*


The only thinks to configure are:
-Defining a weblet-name (myapp.resources)
-Referencing your resource directory path containing your css, js with the weblet init-param element (com.myapp.resources).
com.myapp.resources refers to the directory path com/myapp/resources

3. Referencing a resource managed by the weblets from the JSF component


        String cssFile = FacesWebletUtils.getURL(context, "myapp.resources","/myapp.css");
writer.startElement("link", this);
writer.writeAttribute("rel", "stylesheet", null);
writer.writeAttribute("href", cssFile, null);
writer.endElement("link");

FacesWebletUtils.getURL(context,, "/") is used to retrieve the resources stored in the library jar file.
In the sample code, myapp.css is located in the com/myapp/resources directory.

Conclusion


Weblets is a very usefull library used to simplify the resource management. We can regret that this is not part of the basic JSF framework. You can download and access all weblets documentation here

Saturday, September 27, 2008

Masking the URL bar on an iphone web application

With the firmware 2.1, it’s possible to mask the URL bar with a meta tag. Previous this meta tag instruction, the masking was done with javascript code.


Adding <meta name="apple-mobile-web-app-capable" content="yes" /> instruction in the HTML code will result in masking the URL bar.

Take attention that this instruction is only valid when your webapp is added as the home screen.

Thursday, September 04, 2008

Using the apt ant task

I'm using Jdeveloper and there is not support for the apt task in this IDE. Ant 1.7.0 has a built in support task for Apt.
To use it, add the apt tag in your build file as followed.

Saturday, July 26, 2008

GWT-Ext: Wrapping a Google Map component

The aim of this tutorial is to present how to wrap a Google Map component with GWT-Ext.

GWT-Ext proposes a lot of Google Map wrappers. The tutorial proposes to demonstrate how to wrap the “Direction” and “Map” components. Thanks this component it’s now easy to reuse a Direction in a web page.

Direction widget features:
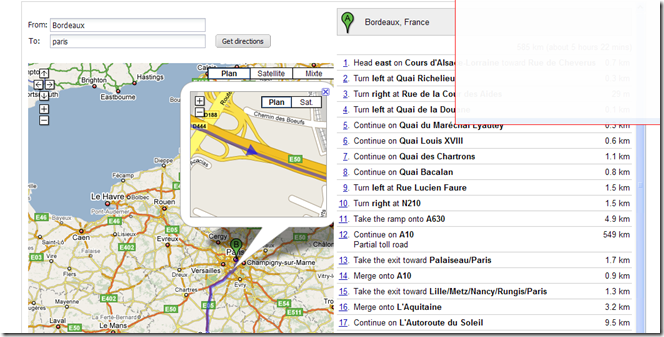
directions

  • Map and direction in the same component
  • Map and directions size are automaticaly adjusted depending component size
  • Optional form to define origin and destination
  • Horizontal or vertical layout


Main steps to create the widget:

Overloading the Panel component
Creating the “<Div>” elements used by the Google Map API
Those 2 elements are used by the Google API (next step) to display the map and the directions components.
        String mapDiv = "
";
String directionsDiv = "
";
_mapHTMLPanel = new HTMLPanel(mapDiv);
_directionsHTMLPanel = new HTMLPanel(directionsDiv);


Initializing the Google Map API
GMap2 and GDirections javascript objects are initialized. $wnd is used by GWT API to access javascript objects.
    private native JavaScriptObject initializeMap() /*-{
var map = new $wnd.GMap2($doc.getElementById('widget_map_canvas'));
map.addControl(new $wnd.GSmallMapControl());
map.addControl(new $wnd.GMapTypeControl());
return map;
}-*/;

private native JavaScriptObject initializeDirections(Directions thisModule) /*-{
var map = this.@com.benevolarc.gwt.client.Directions::_map;
var gdir = new $wnd.GDirections(map, $doc.getElementById('widget_directions'));
$wnd.GEvent.addListener(gdir, "load", function(response) {
if (response && response.getStatus().code == 200) {
thisModule.@com.benevolarc.gwt.client.Directions::directionsOK()();
}
});


Creating the layout (horizontal or vertical) to store the Map and the Direction components
The layout allows to display the map and the directions with 2 options (left-rigth or top-down)
Muliple GWT-Ext layouts are used for that purpose:

  1. FitLayout is used a base class for layouts that contain a single item that automatically expands to fill the layout's container

  2. Panels with ColumLayoutData are used for the Horizontal mode

  3. AnchorLayoutData with PanelListenerAdapter is used for the Horizontal mode


The difficulty was to display an horizontal panel with a height expressed in percentage instead of pixel. The solution was to use a PanelListenerAdapter.
    private void init() {
setLayout(new FitLayout());
setBorder(false);
String mapDiv = "
";
String directionsDiv = "
";
_mapHTMLPanel = new HTMLPanel(mapDiv);
_directionsHTMLPanel = new HTMLPanel(directionsDiv);

//_panel.add(new HTMLPanel("
"));

if (_displayMode == DisplayMode.HORIZONTAL) {
Log.debug("Horizontal mode");
Panel columnLayoutPanel = new Panel();
columnLayoutPanel.setBorder(false);
columnLayoutPanel.setLayout(new ColumnLayout());

col1Panel = new Panel();
col1Panel.setBorder(false);
col1Panel.setLayout(new FitLayout());
Panel panelMap = new Panel();
panelMap.setBorder(false);
_mapHTMLPanel.setMargins(10, 10, 10, 10);
panelMap.setLayout(new AnchorLayout());
if (_displayForm) {
panelMap.add(createFromToForm());
}
panelMap.add(_mapHTMLPanel, new AnchorLayoutData("100% 100%"));
col1Panel.add(panelMap);
col2Panel = new Panel();
col2Panel.setBorder(false);
col2Panel.setLayout(new FitLayout());
col2Panel.add(_directionsHTMLPanel);

columnLayoutPanel.add(col1Panel, new ColumnLayoutData(.50));
columnLayoutPanel.add(col2Panel, new ColumnLayoutData(.50));
columnLayoutPanel.addListener(new PanelListenerAdapter() {
public void onResize(BoxComponent component, int adjWidth, int adjHeight, int rawWidth, int rawHeight) {
col1Panel.setHeight(rawHeight);
col2Panel.setHeight(rawHeight);
}
});


add(columnLayoutPanel);

} else {
Log.debug("Vertical mode");
Panel panel = new Panel();
panel.setLayout(new AnchorLayout());
if (_displayForm) {
FormPanel fPanel = createFromToForm();
panel.add(fPanel);
}
panel.add(_mapHTMLPanel, new AnchorLayoutData("100% 50%"));
_mapHTMLPanel.collapse();
panel.add(_directionsHTMLPanel, new AnchorLayoutData("100% 50%"));
add(panel);
}
}


Invoking the directions
When the user clicks on the "get directions" button a call to the Google API has to be done. A listener is attached on the button and a call to the JSNI method is done
        
goButton.addListener(new ButtonListenerAdapter() {
public void onClick(Button button, EventObject e) {
lauchDirections();
}
});

launchDirections checks if origin and destination are correctly filled and call the setDirections native method.
    private void lauchDirections() {
Log.debug("Getting direction" + _map);
if (_toTextField.getText().length() > 0 && _fromTextField.getText().length() > 0) {
setDirections(_fromTextField.getValueAsString(), _toTextField.getValueAsString(), _locale);
clearErrorMessage();
} else {
Log.warn("From and to must be filled");
setErrorMessage("From and to must be filled");
}
}

The setDirections method calls the Google API method gdir.load. In case of success, the Map and the directions components are updated. In case of error, a message is displayed to the user.
  public native void setDirections(String fromAddress, String toAddress, String locale) /*-{
var gdir = this.@com.benevolarc.gwt.client.Directions::_gdir;
gdir.clear();
gdir.load("from: " + fromAddress + " to: " + toAddress,
{ "locale": locale });
}-*/;


Using the Directions component

Using the component is easy

  1. Displaying the Directions and Map component with origin and destination in the constructor (horizontal layout)
    Default component size is 600px*600px

    directions = new Directions("paris","bordeaux", Directions.DisplayMode.HORIZONTAL);


  2. Displaying the Form allowing the user to enter origin and destination (horizontal layout)

    //directions with Horizontal layout
    directions = new Directions(true, Directions.DisplayMode.HORIZONTAL);
    directions.setWidth("1000px");
    directions.setHeight("800px");
    directions.setBorder(true);


  3. Displaying the Form allowing the user to enter origin and destination vertical layout)

    //directions with Horizontal layout
    directions = new Directions(true, Directions.DisplayMode.VERTICAL);
    directions.setBorder(true);


Conclusion

The tutorial demonstrates how to wrap a Google component. Of course this component is not perfect and a lot of improvement needs to be done.

  1. Improve the look and feel

  2. Support to Google street

  3. Internationalization support

  4. Printing capabilities

  5. And more...


Feel free to reuse it and please don't hesitate to give your opinion. If you find this component usefull, the source can be use for GWT-EXT extenstion...
Thanks for GWT-Ext forum for the support regarding layout management.


Complete Code


package com.benevolarc.gwt.client;

import com.allen_sauer.gwt.log.client.Log;

import com.google.gwt.core.client.JavaScriptObject;

import com.google.gwt.user.client.ui.HTML;

import com.gwtext.client.core.EventObject;
import com.gwtext.client.widgets.BoxComponent;
import com.gwtext.client.widgets.Button;
import com.gwtext.client.widgets.HTMLPanel;
import com.gwtext.client.widgets.Panel;
import com.gwtext.client.widgets.event.ButtonListenerAdapter;
import com.gwtext.client.widgets.event.PanelListenerAdapter;
import com.gwtext.client.widgets.form.Field;
import com.gwtext.client.widgets.form.FormPanel;
import com.gwtext.client.widgets.form.MultiFieldPanel;
import com.gwtext.client.widgets.form.TextField;
import com.gwtext.client.widgets.form.event.FieldListenerAdapter;
import com.gwtext.client.widgets.layout.AnchorLayout;
import com.gwtext.client.widgets.layout.AnchorLayoutData;
import com.gwtext.client.widgets.layout.ColumnLayout;
import com.gwtext.client.widgets.layout.ColumnLayoutData;
import com.gwtext.client.widgets.layout.FitLayout;


public class Directions extends Panel{
//private Panel _panel;
private TextField _fromTextField;
private TextField _toTextField;
private HTMLPanel _mapHTMLPanel;
private HTMLPanel _directionsHTMLPanel;
private JavaScriptObject _map;
private JavaScriptObject _gdir;
public enum DisplayMode {HORIZONTAL, VERTICAL};
private DisplayMode _displayMode = DisplayMode.VERTICAL;
private boolean _displayForm = true;
private Panel col1Panel = null;
private Panel col2Panel = null;
private HTML _errorMessage = new HTML();
private String _from = null;
private String _to = null;
private String _locale = "EN";

public Directions(boolean displayForm) {
_displayForm = displayForm;
init();
}

public Directions(boolean displayForm, DisplayMode displayMode) {
_displayForm = displayForm;
_displayMode = displayMode;
init();
}

public Directions(String from, String to, DisplayMode displayMode) {
_displayMode = displayMode;
_displayForm = false;
_from = from;
_to = to;
init();
}

private FormPanel createFromToForm() {
_fromTextField = new TextField("From", "from", 250);
_toTextField = new TextField("To", "to", 250);
Button goButton = new Button("Get directions");

MultiFieldPanel directionsFormPanel = new MultiFieldPanel();

directionsFormPanel.setBorder(false);
directionsFormPanel.setPaddings(10, 10, 10, 10);
directionsFormPanel.addToRow(_fromTextField, 300);
directionsFormPanel.addToRow(_toTextField, 300);
directionsFormPanel.addToRow(goButton, 100);

FormPanel fPanel = new FormPanel();
fPanel.setBorder(false);
fPanel.setLabelWidth(30);
fPanel.add(_errorMessage);
fPanel.add(directionsFormPanel);
_fromTextField.addListener(new FieldListenerAdapter() {
public void onSpecialKey(Field field, EventObject e) {
if (e.getKey() == EventObject.ENTER) {
lauchDirections();
}
}
});
_toTextField.addListener(new FieldListenerAdapter() {
public void onSpecialKey(Field field, EventObject e) {
if (e.getKey() == EventObject.ENTER) {
lauchDirections();
}
}
});

goButton.addListener(new ButtonListenerAdapter() {
public void onClick(Button button, EventObject e) {
lauchDirections();
}
});
return fPanel;
}

private void setErrorMessage(String message) {
_errorMessage.setHTML("
Error: "+ message + "
");
}

private void clearErrorMessage() {
_errorMessage.setHTML("
");
}

private void lauchDirections() {
Log.debug("Getting direction" + _map);
if (_toTextField.getText().length() > 0 && _fromTextField.getText().length() > 0) {
setDirections(_fromTextField.getValueAsString(), _toTextField.getValueAsString(), _locale);
clearErrorMessage();
} else {
Log.warn("From and to must be filled");
setErrorMessage("From and to must be filled");
}
}

private void init() {
Log.debug("Setting default width and heigth");
setWidth(600);
setHeight(600);
setLayout(new FitLayout());
setBorder(false);
String mapDiv = "
";
String directionsDiv = "
";
_mapHTMLPanel = new HTMLPanel(mapDiv);
_directionsHTMLPanel = new HTMLPanel(directionsDiv);

//_panel.add(new HTMLPanel("
"));

if (_displayMode == DisplayMode.HORIZONTAL) {
Log.debug("Horizontal mode");
Panel columnLayoutPanel = new Panel();
columnLayoutPanel.setBorder(false);
columnLayoutPanel.setLayout(new ColumnLayout());

col1Panel = new Panel();
col1Panel.setBorder(false);
col1Panel.setLayout(new FitLayout());
Panel panelMap = new Panel();
panelMap.setBorder(false);
_mapHTMLPanel.setMargins(10, 10, 10, 10);
panelMap.setLayout(new AnchorLayout());
if (_displayForm) {
panelMap.add(createFromToForm());
}
panelMap.add(_mapHTMLPanel, new AnchorLayoutData("100% 100%"));
col1Panel.add(panelMap);
col2Panel = new Panel();
col2Panel.setBorder(false);
col2Panel.setLayout(new FitLayout());
col2Panel.add(_directionsHTMLPanel);

columnLayoutPanel.add(col1Panel, new ColumnLayoutData(.50));
columnLayoutPanel.add(col2Panel, new ColumnLayoutData(.50));
columnLayoutPanel.addListener(new PanelListenerAdapter() {
public void onResize(BoxComponent component, int adjWidth, int adjHeight, int rawWidth, int rawHeight) {
col1Panel.setHeight(rawHeight);
col2Panel.setHeight(rawHeight);
}
});


add(columnLayoutPanel);

} else {
Log.debug("Vertical mode");
Panel panel = new Panel();
panel.setLayout(new AnchorLayout());
if (_displayForm) {
FormPanel fPanel = createFromToForm();
panel.add(fPanel);
}
panel.add(_mapHTMLPanel, new AnchorLayoutData("100% 50%"));
_mapHTMLPanel.collapse();
panel.add(_directionsHTMLPanel, new AnchorLayoutData("100% 50%"));
add(panel);
}
}

protected void onAttach() {
Log.debug("Component attached");
_map = initializeMap();
_gdir = initializeDirections(this);
if (_from != null && _to != null) {
setDirections(_from, _to, _locale);
} else {
_mapHTMLPanel.collapse();
}
super.onAttach();
}

private native JavaScriptObject initializeMap() /*-{
var map = new $wnd.GMap2($doc.getElementById('widget_map_canvas'));
map.addControl(new $wnd.GSmallMapControl());
map.addControl(new $wnd.GMapTypeControl());
return map;
}-*/;

private native JavaScriptObject initializeDirections(Directions thisModule) /*-{
var map = this.@com.benevolarc.gwt.client.Directions::_map;
var gdir = new $wnd.GDirections(map, $doc.getElementById('widget_directions'));
$wnd.GEvent.addListener(gdir, "load", function(response) {
if (response && response.getStatus().code == 200) {
thisModule.@com.benevolarc.gwt.client.Directions::directionsOK()();
}
});

$wnd.GEvent.addListener(gdir, "error", function(response) {
if (!response || response.getStatus().code != 200) {
thisModule.@com.benevolarc.gwt.client.Directions::directionsError(I)(response.getStatus().code);
}
});
return gdir;
}-*/;

public void directionsError(int error) {
Log.debug("Error");
String errorMessage = "Unknown error";
switch (error) {
case 601: errorMessage = "Missing query";break;
case 602: errorMessage = "Unknown address";break;
case 603: errorMessage = "Unavailable address";break;
case 604: errorMessage = "Unknown direction";break;
default: errorMessage ="Unknown error";
}
setErrorMessage(errorMessage);
_mapHTMLPanel.collapse();
_directionsHTMLPanel.collapse();
}

public void directionsOK() {
Log.debug("Directions OK");
_mapHTMLPanel.expand(true);
_directionsHTMLPanel.expand(true);
}


public native void setDirections(String fromAddress, String toAddress, String locale) /*-{
var gdir = this.@com.benevolarc.gwt.client.Directions::_gdir;
gdir.clear();
gdir.load("from: " + fromAddress + " to: " + toAddress,
{ "locale": locale });
}-*/;

public void setLocale(String locale) {
this._locale = locale;
}

public String getLocale() {
return _locale;
}


}

Sunday, July 20, 2008

Google App Engine: Queries as an SQL “LIKE”

Introduction:

When i have developed my first GAE application, i wanted to use a request with a “LIKE” to find all tuples beginning with a prefix.
GQLQuery does not allow this kind of SQL request (SELECT * FROM user where name LIKE ‘SMIT%’).
The solution is to use this kind of request:


query = self.request.str_POST['query']
queryEnd = query+"\xEF\xBF\xBD".decode('utf-8')
res=db.GqlQuery('SELECT * FROM User WHERE name>=:1 AND name<=:2 ORDER BY nom DESC', query, queryEnd)


I was obliged to modify the sample code provided by the documentation (here)
queryEnd = query+"\xEF\xBF\xBD".decode('utf-8') was added.

Thanks a lot to José Oliver Segura for his support.

Information can be found here

Thursday, July 17, 2008

Inserting code snippet in Blogger

It was really difficult for me to find a solution to insert java code snippets in my Blogger !!
I found a solution using the syntaxhighlighter JavaScript plugin.
The steps used to insert code snippet:
  • Download syntaxhighlighter from syntaxhighlighter
  • Unzip the file and place the Scripts and Styles directories in a URL (location in my sample)
  • Modify your blogger template adding those lines just after the </div></div> <!-- end outer-wrapper –>
  • To publish a post with code snippet, insert your code inside the <pre> or <textarea> tags

<textarea name="code" class="c#" cols="60" rows="10">

... some code here ...

</textarea>

Tuesday, July 15, 2008

Rounded corners panel with GWT

Native GWT solution

GWT provides a native solution to build panels with rounded corners. This solution is done with a DecoratorPanel component.

The rounded corners are build thanks a .css file customization where images needs to be provided in the css file.

html>body .gwt-DecoratorPanel .topLeft {
  background: url(images/corner.png) no-repeat 0px 0px;
}

The drawback of this solution is that images need to be provided when a new rounded panel has to be created with a new color.

Bouwkamp solution

An other solution without providing any images for corner definition is available thanks http://code.google.com/p/com-bouwkamp-gwt/. By this way creating a new rounded corner panel with different colors is a very basic task.

Steps to create a new rounded panel:

  • Download the jar file and reference this file in the classpath
  • Modify the <appli>.gwt.xml and add :

<inherits name='com.bouwkamp.gwt.user.User' />

  • Create your java file:

    By default the height of the corners is 2px. It is possible to set a different height at construction time. The height can be a value between and including 1 and 9. This value doesn't correspond exactly with the height, e.g. 9 is 12px height.

     // all 4 corners are rounded and height index 5
    RoundedPanel rp = new RoundedPanel(yourWidget, ALL, 5);


    In the previous sample yourWidget can be any component like a VerticalPanel


    You can even define the color of the corner programaticaly:


    // all 4 corners are rounded.
    RoundedPanel rp = new RoundedPanel(yourWidget);
    rp.setCornerColor("red");


  • Customize the .css application file for rounder corner customization


  • Default the css style name of the rounded corner divs is cbg-RP. Use it to set the colors of the corner. For example:


     .cbg-RP { background-color:#c3d9ff; }


    Conclusion


    The solution provided by the Bouwkamp library is very easy to use. Some improvement can be done like providing a rounded corner support and shadow borders. It seems javascript libary is available for this feature see:


    http://www.ruzee.com/blog/shadedborder/


Saturday, July 12, 2008

GWT-Ext, Remote ComboBox tutorial

Designing a local comboBox is a basic documented task. For the remote mode (where data to be suggested are returned from a server) the documentation is not so clear.

In this post, a basic review of the LOCAL mode is done and in a second part, the REMOTE mode is developped.

Local comboBox mode:

Basic steps:

  1. Store initialization
  2. Loading the store
  3. Creating the combobox with LOCAL mode
  4. Linking the combobox with the store

Sample code:

        final Store store = 
new SimpleStore(new String[] { "civilite", "desc", },
new String[][] { new String[] { "Mr", "Mr" },
new String[] { "Mlle", "Mlle" },
new String[] { "Mde", "Mde" } });
store.load();

final ComboBox cb = new ComboBox();
cb.setForceSelection(true);
cb.setMinChars(1);
cb.setFieldLabel("Civilité");
cb.setStore(store);
cb.setAllowBlank(false);
cb.setDisplayField("civilite");
cb.setMode(ComboBox.LOCAL);
cb.setTriggerAction(ComboBox.ALL);
cb.setEmptyText("Enter civilité");
cb.setLoadingText("Recherche...");
cb.setTypeAhead(true);
cb.setEditable(false);
cb.setSelectOnFocus(true);
cb.setWidth(230);

cb.setHideTrigger(false);
add(cb);


Remote comboBox mode:


In that case, the store needs to be constructed dynamicaly from the server.

Each time the user tapes a new key in the combobox, a request has to be sent to the server to update the suggest box. The current combobox value has to be sent as a parameter to the server.

The combobox REMOTE mode uses a POST query to the server with the query parameter filled with the current combobox value.

The server side (any servlet or CGI) needs to analyze the POST request, retrieve the query parameter and return an answer to be displayed in the combobox (in the sample code, JSON is used). Some parameters can be set for autocomplete configuration:

setMinChar: The minimum number of characters the user must type before autocomplete activate (default is 4)

setQueryDelay: The length of time in milliseconds to delay between the start of typing and sending the query to filter the dropdown list (defaults to 500 ms)

Basic steps:

  1. Store creation and loading with a HttpProxy and a JsonReader

  2. Combobox creaction with REMOTE mode

  3. Linking the combobox with the store

  4. Creating the server side part (servlet or CGI) by analyzing the query parameter on the POST request.


Sample code:


         HttpProxy dataProxy = new HttpProxy("/rpc/adherents");
final String resultTpl = "

{nom} {prenom}

{email}
";
RecordDef adherentsRecordDef =
new RecordDef(new FieldDef[] { new StringFieldDef("id"),
new StringFieldDef("nom"),
new StringFieldDef("prenom"),
new StringFieldDef("telephoneFixe"),
new StringFieldDef("telephoneMobile"),
new StringFieldDef("email"),
new StringFieldDef("adresse"),
new StringFieldDef("codePostal"),
new StringFieldDef("ville") });
JsonReader reader = new JsonReader(adherentsRecordDef);
reader.setRoot("adherents");
Store store = new Store(dataProxy, reader);
store.load();
ComboBox cb = new ComboBox();
cb.setStore(store);
cb.setDisplayField("nom");
cb.setId("nom");
cb.setTypeAhead(false);
cb.setLoadingText("Searching...");
cb.setFieldLabel("Nom");
cb.setWidth(230);
cb.setTpl(resultTpl);
cb.setPageSize(10);
cb.setHideTrigger(true);
cb.setMode(ComboBox.REMOTE);
cb.setTitle("Users");
//cb.setHideLabel(true);
cb.setItemSelector("div.search-item");

Frederic shared items